Monday, January 30, 2012

Having A Ball With Hair!!

As promised, I'm going to give y'all some tips on creating a Civil War hairstyle for a ball. If your hair is shoulder-length or longer, you can use many variations of the following style.

First, follow the steps in my previous blog to part off front sections of the hair. Then create the bun, but this time, leave the ends of the hair draping down on one side. You can use a curling iron to make little sausage curls - we didn't have time to do this but you get the idea of where the hair goes from the photo. Twist or braid the front sections as before, but you can curl the ends if you want to add to the ringlets draping down. Or you can tuck the ends under the bun.


A comb looks lovely with this hairstyle. Combs were very popular in that era and were made of many materials such as tortoise shell, gutta percha, horn or gilded metals. This is a faux tortoise shell comb.


Next you can add flowers and ribbons! Victorian ball hair pieces were often circlets or half-circles that you pinned into your hair. We used a half-circle hair piece with colors that looked gorgeous with Merri's hair! (Psst, you can check my mom's Etsy shopwww.southernserendipity.etsy.com for other ball hair pieces!)


You can have fun adding extra sprays of flowers besides the main hair piece too.


This is my sis with the same general hairstyle - a bun with curls coming off the side.


Here are some period images of hairstyles from the late 1850s-early 1860s. Note the combs and the placement of the flowers.


Once again, thanks to our awesome model, Merrianna!!


Monday, January 16, 2012

How To Do A Civil War Hairstyle

By popular demand, I'm going to do some blog posts on creating hairstyles for the 1860s. Since I have long, thick hair, I wanted to use someone else for a model - someone who had a shorter, more modern hairstyle.

However, my sis also has long thick hair, and Mom's hair is very short. No one in our family has a nice, shoulder-length style for me to play with! Just when I thought there was no one to pester, a good friend with formerly long hair surprised us today by coming for a sleepover with a new haircut! She graciously offered to be a model for my blog post (and a fruit coolatta from Dunkin Donuts as bribery didn't hurt!).

So here is our wonderful model Merrianna with her beautiful titian hair as a my demo! Though I did this hairstyle for Merrianna (while she slurped her coolatta! :D), you can easily do it on yourself with some practice.

My materials


The lovely model (and the bribe!)


I started by parting off a front section on each side.


Then I put the back section into a nice smooth ponytail.


I twisted the ponytail into a bun. This is where having some gel, hairspray or good old-fashioned pomade would have made the job easier. But hey, it turned out pretty well anyway!


Since her hair was nice and clean and slippery, I used hair clips to secure it. If you absolutely need to, you can use them too. But since they weren't around in 1860, it's better to use something goopy on your hair to make it stay put (which they did do) and then use those big authentic hair pins instead. However, the clips worked fine for our demo.


Next, I took one of the side sections in front and twisted it. You can twist it under, towards your face. Or you can twist it up, away from your face. Both styles were used, so you'll have to decide which fits your face shape the best. Thin hair typically looks best if twisted up and away from the face.


Twist the hair all the way to the end. You can braid it, if you prefer. Start the braid near the top of the ear, not at the front scalp-line.


Braided or twisted, take the piece of hair and wind it around your bun. It doesn't matter if it's not long enough to go all the way around the bun. If you're using hair pins, pin it against the bun as you go. If using clips, do the same thing.


Take the other front section and do the same thing with it.


Here's generally how it should look. Isn't this a lovely do? It should be quite secure as well, especially if you used plenty of hair spray and gel.


Here is a drawing of Queen Victoria with the same general hairstyle. If your hair is long, you can loop the braid or twist lower, like she did.


If you are reenacting a lady at home, you can leave your head bare if you like. However, ladies often wore caps or nets during the day. So here's how to put on a net.

First, put it around your hands and make sure it's fully opened.


Hook the bottom under your hair-do.


Pull it forward and adjust around your face.


Ta-da! Ain't she cute?


This hairstyle also looks good with a cap.


And a bonnet!


Next time, I'll show you our demo pictures of how to vary this for a ball hairstyle. For now, I'll leave you with a final cute photo op we just couldn't resist:


Thanks, Merrianna!

Friday, January 13, 2012

Snoods or Nets?

Victorian reenacting is catching on, whether you're a Civil War enthusiast or a Dickens lover. People are bringing back some really lovely old-fashioned styles of the mid-Victorian era. But there are one or two "fashions" of the Victorian era that never really existed - and I hate to say it, but the wearing of snoods is one of them.

Now before y'all get excited, let me assure you that I know how handy they are. Snoods cover your hair so you don't have to do anything to it.


You can even show off your favorite color with your snood.


You can even make a fashion statement with a snood.


But if you've done any research into authentic Victorian hairstyles, these pictures are making you say what I said: OW!

Not that Victorian ladies didn't keep their hair contained. But they first put their hair up, then contained it... and the "container" (if any) was a very fine hairnet or a highly elaborate ribbon net.

Of course, if she went out she probably wore a bonnet, regardless of whether she also had a net. But authentic bonnets are expensive. So are hair extension pieces, which many ladies with modern haircuts need. So what is a reenacting lady to do if she wants a nice covering for her hair?

First, know that the front of your hair will show. So always part it in the center and smooth it down. If you have bangs, you can use hair gel or hair spray (or both!) to make both sides lay nicely. Sometimes rolling your hair back can also be a good way to contain short hairs.

Next, if your hair is long enough, put the back up into a bun. 1860s buns tended to be in the low-middle portion of the head, not high up like the later 1870s-80s styles. If you hair is not long enough for a bun, put some hair gel or hair spray on it to keep it smooth and in place.

Finally - the covering! In another post, I will cover proper bonnets and hats for the Civil War era. But for now, let's focus on the types of nets that were used. Hairnets of the 1860s were either a fine thin net, or a beautiful thick woven net made of silk ribbon or silk chenille. A pretty band was often attached to the net across the top which included braided or ruched ribbon, flowers, beads, or lace. Nets in the 1860s were 
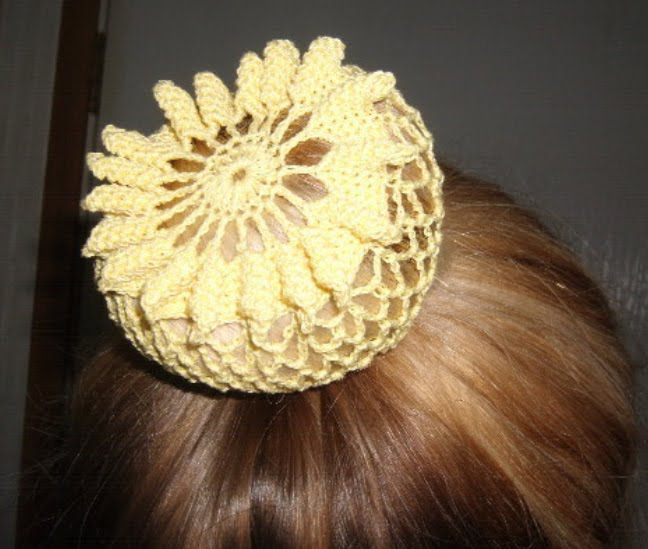
not the thick crocheted nets of the 1950s.


Have you ever noticed that many ladies in 1860s photos appear to have some kind of ripple across the top of their head? It's not usually a braid - it's the ribbon band on their hair net.


If you don't know how to create one of these nets yourself, you can often find them at sutler's tents at reenactments. My mom has some lovely ones in her Etsy shop. This is me wearing one I snitched from her stash! :)


I mentioned the ribbon and chenille nets - here are some original pictures of them. Isn't this chenille hair piece absolutely adorable? I'm going to make one for myself one of these days!


This is a ribbon hairnet and yes, those are cute little bees on it! Obviously, with all the beautiful gold and ribbon work on this one, it's meant to be an evening headdress. Wouldn't you look dramatic in this?


And here is my mom, wearing one of those evening ribbon nets, along with a comb and some lovely flowers and ribbons to dress it up. Doesn't she look glamorous? (Just a little secret - my mom's hair is very short! She wears a false bun under her net for evening wear, and she wears a lace cap for day wear!)


So that's the scoop on hairnets! If anyone's interested in a blog on how to do hair, let me know and I may do a post on that in the future. For now... here's a cute picture I took at a recent ball. Even the best designed hairstyle may need a little help from a girlfriend occasionally - here's Mom helping my sis with her hair piece. Isn't that cute?